Getting started
- Umoh Bassey-Duke
3. Paga Connect Basic Flow
The OAuth2 service implemented by Paga Connect conform to the standard specification, is the Authorization Code flow.
High level flow
In order to make request on behalf of a user, the OAuth2 Client must obtain an Access Token from the OAuth2 Service and provide the Access Token with each request on behalf of the user. The Access Token represents the permission that the user and the service have provided to the Client to make specific requests on behalf-of the user.
Obtaining The Authorization Code
Forward the user to the authorization endpoint URI (see authorization URI below).
The user will be asked to authenticate, and authorize the your Client to execute operations on their behalf.
After validating authorization from the user, we will redirect the user’s agent back to a Uri provided by you (redirect_uri parameter provided with authorization request) and include in there a one-time Authorization Code.
Your Client will extract the Authorization Code and make a separate request (not visible to the User) to get an Access Token, providing the one-time Authorization Code and your Client credentials (client id and password provided to you).
If the request for the Access Token is valid, we will return a new Access Token in the response.
Your Client can now make requests to secured URIs on behalf of the user, by providing the Access Token with the request.
See Fig 1.0 Below for more information.
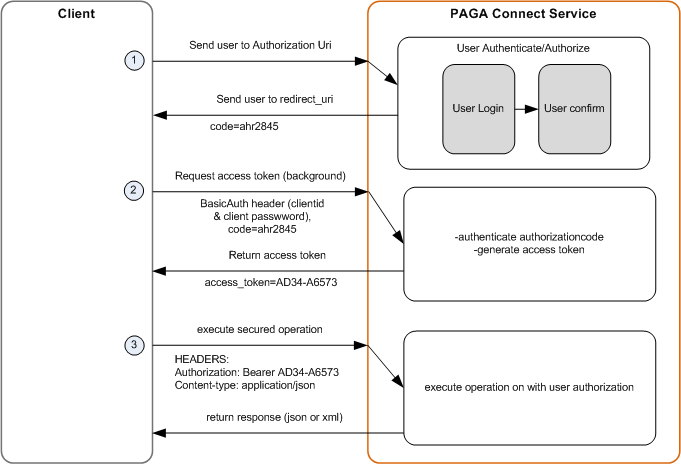
Fig 1.0 Authorization Code Grant flow
5. Implementation Details
Obtaining the Authorization Code
The first time you need to obtain an access token to execute secured operations on behalf of a user, you will need to obtain an authorization code which is provided if the user has authorized your client to obtain this access code. To do this, you will need to forward the user to the authorization URI. This typically means submit a POST or GET request from the User’s User-Agent (typically browser) or launching a browser session within the User’s app session and loading the Authorization URI.
https://mypaga.com/paga-webservices/oauth2/authorization
Authorization Code request parameters
The Following parameters need to be passed along with the authorization code request.
client_id = <client id>
This is identifier for your OAuth 2.0 client. You will be assigned a unique client id for your client along with a client secret (password) that will be discussed later. Note that individual organizations would have multiple client ids if they implement multiple OAuth 2.0 clients.response_type = code
This is a pre-determined constant per the specification to indicate that this request is for an authorization coderedirect_uri = <your redirect uri>
This is the URI for your client that our OAuth2 server should redirect the user-agent back to after successful (or denied) authentication by the userstate =<client state>
This is optional state (data) that should be returned back to your client from the server with the response (can be used to persist information)scope =<requested permissions>
This is a space delimited string that allows the the client to specify the scope of access required. This scope is also used by the authorization server to inform the users of what permissions they are providing to the client. The scope parameters are outlined in table 1.0 below.user_data =<requested user information>
This is an optional space delimited string that allows the the client to specify the scope of user data required. This scope is also used by the authorization server to inform the users of what permissions they are providing to the client. The user_data parameters are outlined in table 1.1 below.
Optional Parameters
display_name = <organization display name>
An organization can have multiple display names. Display names can be used for styling purposes as well. See the article on Customizing The Look and Feel for more information on styling.Optional card Payment parameters
Client's can enable the option to accept payments directly without going through the Authorization and access token requests. See the article on /wiki/spaces/PagaConnect/pages/1572904for more information.
Authorization Code scope
| Scope | Description |
|---|---|
| MERCHANT_PAYMENT | This permission allows you to charge a user's Paga account |
| USER_REQUEST_ACCOUNT_BALANCE | This allows you to request the Paga user's account balance |
| MONEY_TRANSFER | This allows you to transfer money to a Credit a paga User's account |
| USER_DETAILS_REQUEST | This allows you to request a user's details (See Table 1.1 for more info) |
Table 1.0 Authorization Code Scope parameters
Authorization Code user_data parameter
| User Data | |
|---|---|
| FIRST_NAME | Get the user's first name |
| LAST_NAME | Get the user's last name |
| MOBILE_NUMBER | Get the user's paga mobile number |
Get the user's paga email address. | |
| USERNAME | Get the user's paga username |
Table 1.1 User Details Request Parameter.
Sample Authorization Code requests
See sample Authorization Code requests below.
https://mypaga.com/paga-webservices/oauth2/authorization?client_id=xxxxx-xxxxx-xxxxx-xxxxx&response_type=code&redirect_uri=http://localhost:8080/oauth2&scope=MERCHANT_PAYMENT USER_DEPOSIT_FROM_CARD USER_REQUEST_TRANSACTION_HISTORY MONEY_TRANSFER

https://mypaga.com/paga-webservices/oauth2/authorization?client_id=xxxxx-xxxxx-xxxxx-xxxxx&response_type=code&redirect_uri=http://localhost:8080/oauth2&scope=MERCHANT_PAYMENT

https://mypaga.com/paga-webservices/oauth2/authorization?client_id=xxxxx-xxxxx-xxxxx-xxxxx&response_type=code&redirect_uri=http://localhost:8080/oauth2&scope=USER_DETAILS_REQUEST&user_data=MOBILE_NUMBER EMAIL USERNAME LAST_NAME FIRST_NAME
Requesting User Details
In order to request user details, you will have to include the USER_DETAILS_REQUEST in the scope parameter, and the required user information in the user_data parameter.
Scope and Data parameters
The OAuth 2.0 Specification indicates that the scope parameter values be 'space delimited', however some of the major implementations do support 'comma delimited' parameters as well. Paga connect also supports comma delimited parameters, however this should only be used if your client implementation does not support space delimited parameters, to ensure future compatibility.
Sending the user to this authorization Uri notify the user of the request by your client to have them provide permission to execute specific operations on their behalf. The client will then be required to authenticate using their Paga credentials in order to provide that permission on such operations. See the images below.
| Paga Connect Login Paga | Paga Connect Access Approval page |
|---|---|
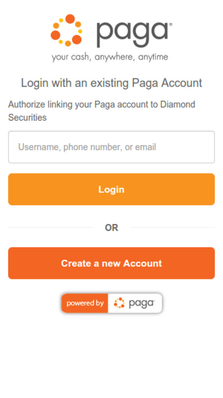 | 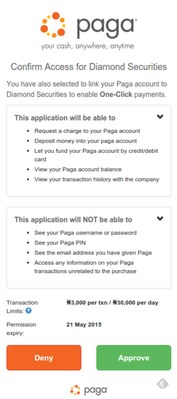 |
Paga Connect Scope
The Paga user has to approve ALL Operation and data requests. Ensure to include all the scopes required, Any change in scope will require the paga user to re-authenticate.
Following the users authorization (or denial), the user will be redirected back to the Uri you provided in the redirect_uri parameter in your request.
If the user granted authorization, the request/redirect to the URI will include the following request parameters:
- code = <authorization code>
This is the one-time authorization code that you will use to request for an access code (via a separate request) - state = <client state>
This is the state provided by your client (if any provided) in your request to the authorization Uri
If the user denied authorization or there was an error during the authorization process, the request/redirect to the URI will include the following request parameters:
- error = <error code>
One of a standard set of error codes indicating the nature of the error (see RFC section 4.1.2.1 for standard error codes) - error_description = <error description>
Human readable text providing additional information to assist the client in understanding the error that occurred
Summary
| Authorization Code Request | |
|---|---|
| URI | http://mypaga.com/paga-webservices/oauth2/authorization |
| Headers | N/A |
| Parameters | client_id=<your client id>(required) |
| Authorization Code Request Redirect (Success) | |
|---|---|
| URI | <your redirect uri> |
| Headers | N/A |
| Parameters | code=<authorization code> |
| Authorization Code Request Redirect (Error) | |
|---|---|
| URI | <your redirect uri> |
| Headers | N/A |
| Parameters | error=<error code> |
Authorization Code Validity
The Authorization code is only valid for 60 Seconds after it is issued.
Obtaining the Access Token
Following a successful authorization request to your Client with an authentication code, you will need to send a background request to the Paga OAuth 2.0 service to obtain the access token. Note that this is call made in the "background". i.e the user's user-agent (browser) is not directed to this URL as it is critical that the user does not see the parameters/headers included in this request (because they include your client password).
https://mypaga.com/paga-webservices/oauth2/token
For this request, you will need to supply authentication credentials, using the HTTP Basic authentication (HTTP basic authentication requires and encoded HTTP header). The authentication credentials are your client id and client password. Most all web frameworks will provide a mechanism for supplying HTTP basic authentication credentials per the standard HTTP basic authentication header. See the following articles below for more information
- HTTP Basic Authentication (Wikipedia)
- HTTP Authentication: Basic and Digest Access Authentication (Specification)
Access Token Request Parameters
For this request, you will need to supply the following parameters:
- grant_type = authorization_code
This is a pre-determined constant per the specification indicating that you are requesting an access token using an authorization code redirect_uri = <your redirect uri>
This the URI for your client that our OAuth2 server should redirect the user-agent after successfully obtaining (or failing to obtain) the access token.- code = <authorization code>
The authorization code returned back to you in the previous authorization step - scope = <requested permissions>
This is a space delimited string that allows the the client to specify the scope of access required. This scope is also used by the authorization server to inform the users of what permissions they are providing to the client. - user_data = <requested data permissions>
This is an optional space delimited string that allows the the client to specify the scope of user data required. This scope is also used by the authorization server to inform the users of what permissions they are providing to the client.
The redirect_uri, scope and data parameters must be identical with those used in the Authorization code request.
Firefox RESTClient plugin can be used to test the web service requests for the access token.
If your client authentication credentials (HTTP Basic authentication header) and the authorization code you provide are valid, this will return a response to you with the Access Token in the response back to you per the specification. This access token is now what you will store and associate with the user so that for subsequent requests by this user, you will simply provide the access token and skip these authentication steps. A successful response will have the following:
access_token = <access token>
This is final access token you will use to execute secured operations
token_type = bearer
This is the type of access token granted as defined by the specification. The token type provided is bearer.
expires_in: <expiration date>
This is the number of seconds until the token expires, from now (the first time you retrieve the token).
refresh_token: <token value>
This is a token that can be used to re-acquire a new access token after the old one expires. Currently not in use.
If the access token request fails or there was an error during the acquisition process, the request/redirect to the URI will include the following request parameters:
error = <error code>
One of a standard set of error codes indicating the nature of the error (see the OAuth 2.0 specification for standard error codes)
error_description = <error description>
Human readable text providing additional information to assist the client in understanding the error that occurred
Sample Access Token Request
https://mypaga.com/paga-webservices/oauth2/token?grant_type=authorization_code&redirect_uri=http://localhost:8080&code=xxxxx&scope=USER_DEPOSIT_FROM_CARD,MERCHANT_PAYMENT,USER_DETAILS_REQUEST&user_data=FIRST_NAME,LAST_NAME,USERNAME,EMAIL,ACCOUNT_BALANCE
{"access_token":"xxxx-xxxx-xxxx-xxxxxxxxxxx",
	"refresh_token": "xxx-xxxx-xxxxx-xxxxxxx",
	"token_type":"bearer",
	"expires_in":8639999,
	"scope":"MERCHANT_PAYMENT USER_DEPOSIT_FROM_CARD USER_DETAILS_REQUEST USER_REQUEST_TRANSACTION_HISTORY",
	"user_data":"ACCOUNT_BALANCE EMAIL FIRST_NAME LAST_NAME USERNAME"
}
Access Tokens are valid for 100 days